Enhance your soap with the benefits of aromatherapy using essential oils.
Combining Aromatherapy and Soap Making: Using Essential Oils in Square Molds
Aromatherapy and soap making go hand in hand! In this blog post, we’ll discuss how to incorporate essential oils into your soap recipes when using reusable square molds. We’ll cover which oils to choose, their benefits, and how to properly measure and mix them into your soap for a delightful sensory experience. Create soaps that not only look good but smell amazing too!
Combining Aromatherapy and Soap Making: Using Essential Oils in Square Molds
Soap making has become a beloved craft for many, offering the perfect blend of creativity and practicality. Add the soothing benefits of aromatherapy into the mix, and you’ve got a recipe for not just beautiful bars of soap, but also a sensory experience that can uplift your mood, calm your mind, or energize your spirit. One of the simplest and most versatile ways to get started is by using square molds, which are beginner-friendly and create sleek, professional-looking soaps.
In this article, we’ll explore how to combine the art of soap making with the therapeutic properties of essential oils, all while working with square molds to create stunning and functional masterpieces.
Why Combine Aromatherapy with Soap Making?
Aromatherapy is the practice of using essential oils derived from plants to promote physical and emotional well-being. Each essential oil carries its own unique properties—lavender for relaxation, citrus for energy, eucalyptus for clarity, and so on. By incorporating these oils into soap, you can create products that don’t just cleanse your skin but also enhance your mood and overall wellness.
Soap making, on the other hand, allows you to control the ingredients that go into your product. This makes it ideal for those with sensitive skin or anyone looking to avoid harsh chemicals found in commercial soaps. When you bring aromatherapy into the process, you’re essentially creating a self-care item that’s both luxurious and functional.
Why Choose Square Molds?
Square molds are a fantastic choice for soap making because they’re simple to use and offer a clean, modern aesthetic. Unlike intricate molds with detailed designs, square molds allow you to focus on the quality of your soap rather than worrying about whether it will pop out cleanly.
Square bars are also practical—they stack easily for storage and make great gifts. Plus, their uniform shape makes them ideal for experimenting with layering techniques or embedding decorative elements like dried flowers or herbs.
Getting Started: What You’ll Need
Before you dive into soap making, gather all your supplies. Here’s a basic list to get you started:
Ingredients:
- Soap Base: Choose a melt-and-pour soap base like glycerin, shea butter, or goat milk. These are easy to work with and widely available.
- Essential Oils: Select oils based on your desired benefits. For example:
- Lavender for relaxation
- Peppermint for invigoration
- Lemon or orange for a refreshing boost
- Tea tree for its antibacterial properties
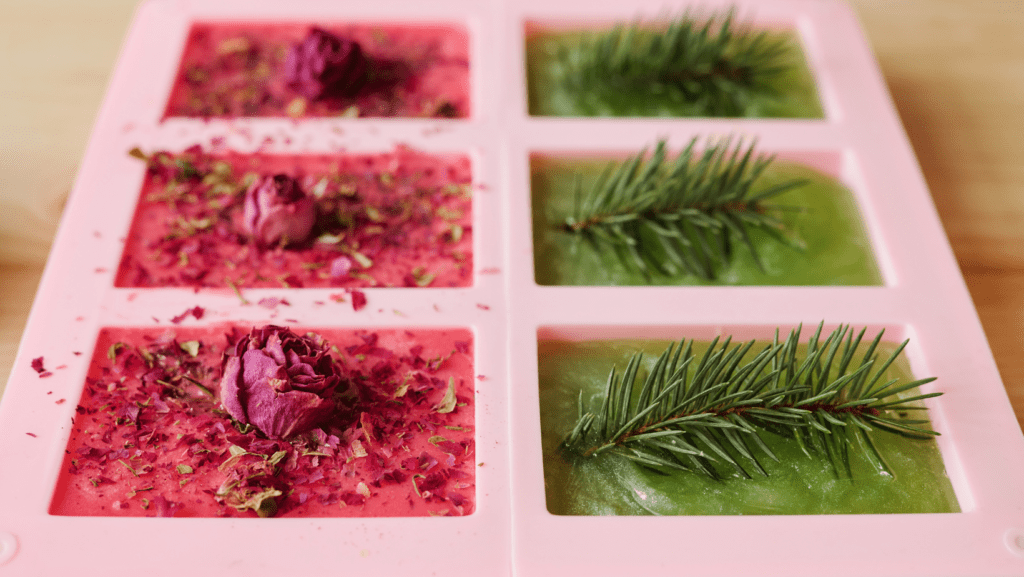
- Add-ins (optional): Dried flowers (like lavender buds or rose petals), oatmeal, or natural colorants like mica powders or turmeric can add texture and visual appeal.
Tools:
- Square Soap Molds: Silicone molds are highly recommended because they’re flexible and make it easy to remove the finished soap.
- Double Boiler or Microwave-Safe Container: For melting the soap base.
- Mixing Utensils: A heat-resistant spatula or spoon works well.
- Measuring Tools: A digital scale and droppers for precise measurements of oils and additives.
- Spray Bottle with Rubbing Alcohol: To eliminate bubbles on the surface of the soap.
Step-by-Step Guide to Aromatherapy Soap Making
Step 1: Melt Your Soap Base
Cut your soap base into small cubes to help it melt evenly. Place it in a double boiler or microwave-safe container and heat until fully melted. If using a microwave, heat in 30-second intervals, stirring in between to prevent overheating.
Step 2: Add Essential Oils
Once your soap base has melted, remove it from heat and let it cool slightly—around 120–130°F (49–54°C) is ideal. This ensures the essential oils retain their therapeutic properties without evaporating due to excessive heat.
Add 10–15 drops of essential oil per pound of soap base, depending on how strong you want the scent to be. Stir gently but thoroughly to distribute the oil evenly.
Step 3: Customize Your Soap
Here’s where you can get creative! Mix in dried flowers, herbs, or natural colorants for added flair. For example:
- Sprinkle dried lavender buds into the mold before pouring the soap for a decorative top layer.
- Add a pinch of turmeric for a warm golden hue or spirulina powder for a green tint.
- Layer different colors by pouring one color at a time and letting each layer set slightly before adding the next.
Step 4: Pour Into Square Molds
Carefully pour the melted soap mixture into your square molds. If bubbles form on the surface, spritz them lightly with rubbing alcohol to pop them and ensure a smooth finish.
Step 5: Let It Set
Allow the soap to cool and harden completely in the molds—this usually takes 2–4 hours at room temperature or about an hour in the fridge if you’re in a hurry. Once set, gently pop the soaps out of the molds.
Tips for Success
- Don’t Overdo It with Essential Oils: While tempting, adding too much essential oil can irritate the skin or overpower the scent profile of your soap. Stick to recommended amounts for safety and balance.
- Test Your Combinations: Not all essential oils blend well together. Before committing to a full batch, test small amounts of your chosen oils to ensure they complement each other both in scent and therapeutic effect.
- Label Your Creations: If you’re making multiple types of soap, label them with their ingredients and scents—especially if you plan to gift or sell them!
- Experiment with Textures: Try embedding loofah slices for exfoliation or swirling two colors together for a marbled effect. Square molds provide a perfect canvas for these techniques!
The Joy of Handmade Aromatherapy Soaps
There’s something incredibly satisfying about creating your own soaps infused with essential oils tailored to your needs or preferences. Whether you’re crafting lavender-scented bars for a relaxing bath or citrusy soaps to energize your mornings, the process is as enjoyable as the end result.
Square molds make this craft accessible to beginners while still offering plenty of room for creativity as you grow more confident in your skills. Plus, these handmade soaps make thoughtful gifts that showcase your effort and care—perfect for birthdays, holidays, or just because!
So why not give it a try? Gather your supplies, choose your favorite essential oils, and start crafting aromatic soaps that will bring joy to your daily routine or brighten someone else’s day!


