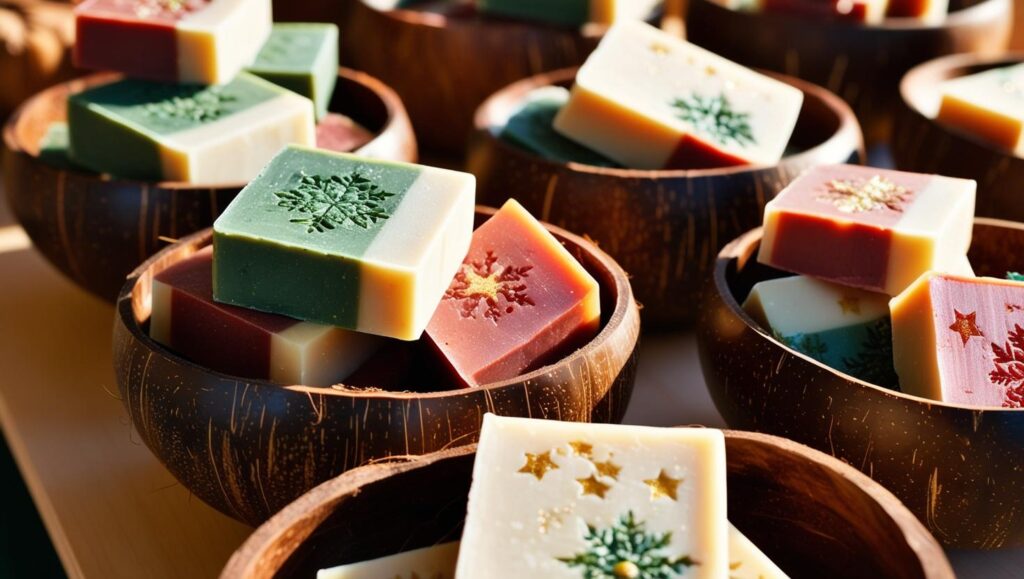
Create festive soaps for every season using square molds!
Seasonal Soaps: Crafting Holiday-Themed Bars with Square Molds
Celebrate the seasons with handmade soaps! In this blog post, we’ll share ideas for crafting holiday-themed soaps using reusable square molds. From pumpkin spice for fall to peppermint for winter, we’ll provide recipes and decorating tips to help you create soaps that capture the spirit of each season. Get ready to spread some seasonal cheer!
Seasonal Soaps: Crafting Holiday-Themed Bars with Square Molds
The holiday season is a time for creativity, warmth, and thoughtful gifts. What better way to celebrate than by crafting your own holiday-themed soaps? Handmade soaps not only make delightful presents, but they also add a touch of festive magic to your home. Using square molds as your base, you can create stunning, personalized bars that capture the spirit of the season. Let’s dive into the art of seasonal soap-making and explore how you can craft these lovely creations with ease.
Why Choose Square Molds?
Square molds are a fantastic choice for soap-making, especially for beginners. Their clean, geometric shape provides a versatile canvas for creativity, allowing you to experiment with colors, layers, and designs. The straight edges make it easy to cut and package your soaps, giving them a polished, professional look. Plus, square bars are perfect for stacking or arranging in gift boxes, making them ideal for holiday gift-giving.
Seasonal Inspiration: Themes to Try
The beauty of holiday-themed soaps lies in their ability to reflect the season’s charm. Here are a few festive ideas to inspire your creations:
- Winter Wonderland
Create snowy white bars with a touch of shimmer using mica powder. Add a hint of peppermint or eucalyptus essential oil for a crisp, refreshing scent that evokes frosty mornings. - Gingerbread Delight
Brown and cream-colored layers mimic the look of gingerbread cookies. Use cinnamon or nutmeg essential oils for a warm, spicy aroma that instantly reminds people of holiday baking. - Candy Cane Swirl
Red and white swirls bring the iconic candy cane to life. Peppermint essential oil is a must for this cheerful design! - Holiday Evergreen
A deep green bar with flecks of gold or white captures the beauty of a Christmas tree. Use pine or cedarwood essential oils for an earthy, forest-like scent. - Festive Confetti
Incorporate colorful soap shavings or embeds into clear glycerin soap to create a fun, confetti-like effect. This is perfect for New Year’s celebrations!
Getting Started: Supplies You’ll Need
Before you begin crafting your seasonal soaps, gather the following supplies:
- Square Soap Molds: Silicone molds are easy to use and ensure your soaps pop out smoothly.
- Soap Base: Choose from melt-and-pour bases like glycerin, shea butter, or goat milk.
- Essential Oils: Scents like peppermint, cinnamon, pine, and vanilla are perfect for the holidays.
- Colorants: Use soap-safe mica powders, liquid dyes, or natural colorants like cocoa powder or turmeric.
- Additives: Glitter (biodegradable), dried herbs, or embeds for extra flair.
- Mixing Tools: Heat-safe bowls, spatulas, and droppers for precise measurements.
- Packaging Supplies: Ribbons, labels, and small boxes or bags for gifting your creations.
Step-by-Step Guide to Crafting Holiday Soaps
1. Melt Your Soap Base
Cut your soap base into small chunks and melt it in a heat-safe bowl using a microwave or double boiler. Stir gently to ensure it melts evenly without forming bubbles.
2. Add Color and Scent
Once melted, add your chosen colorants and essential oils. Start with a few drops of each and adjust until you achieve your desired shade and fragrance strength. Remember, less is more when it comes to essential oils!
3. Pour Into Molds
Carefully pour the mixture into your square molds. If you’re layering colors or adding embeds, work in stages—pour one layer, let it set slightly, then add the next.
4. Add Decorative Touches
Sprinkle glitter on top, press in dried herbs, or swirl colors together with a toothpick for unique designs. If using embeds like soap shavings or small shapes, place them in the mold before pouring the soap base over them.
5. Let It Set
Allow your soaps to cool and harden completely. This usually takes a few hours at room temperature or about an hour in the fridge.
6. Remove and Trim
Gently pop your soaps out of the molds once they’re fully set. If needed, trim the edges with a knife to achieve clean lines.
7. Package and Label
Wrap your soaps in wax paper or shrink wrap to keep them fresh and protected. Add festive ribbons or labels with the scent name and ingredients for a personal touch.
Tips for Success
- Plan Your Design: Sketch out your ideas before you start to avoid last-minute changes that could complicate the process.
- Test Colors and Scents: Mix small batches first to ensure you’re happy with the results before committing to larger quantities.
- Be Patient: Let each layer set properly before adding the next to prevent colors from bleeding together.
- Practice Safety: Always handle hot soap bases carefully to avoid burns.
The Joy of Gifting Handmade Soaps
There’s something incredibly special about giving a gift you’ve made yourself. Holiday-themed soaps are not only beautiful but also practical—everyone loves a thoughtful gift they can actually use! Package them in sets with complementary scents or pair them with other handmade items like candles or bath salts for an extra-special touch.
Whether you’re crafting for friends and family or simply indulging in a creative hobby, making seasonal soaps is a rewarding way to celebrate the holidays. With square molds as your trusty tool and endless design possibilities at your fingertips, you’re sure to create something truly magical this season. Happy soap-making!


